Why a robot vacuum maintenance schedule adds years of life
A consistent robot vacuum maintenance schedule can be the difference between a short, tired four years and a solid five to six years of useful service. iRobot, Roborock, and Ecovacs typically quote battery and consumable lifespans in the three to five year range for normal use, and user surveys on retailer sites often show owners keeping well-maintained models like the Roomba i7, Roborock S7, and Ecovacs Deebot T10 in service for roughly four to six years. When a robot vacuum dies early, the real culprits are almost always suction loss from a clogged vacuum filter, wheel drag from wrapped hair, and dock misalignment from dirty sensors rather than dramatic motor failure. Treat your robotic vacuum like a compact vacuum cleaner that lives on the floor, and you quickly see how dust, pet hair, and grit quietly grind away at performance.
For a busy parent, the goal is simple: you want the best robot that quietly cleans while kids nap, not another gadget that needs constant babysitting. A realistic vacuum maintenance plan focuses on the parts that actually fail in daily use, such as the main brush, the side brush, the dust box, the filter, and the base station contacts, instead of obsessing over rare issues like burned out suction motors. That kind of targeted maintenance helps robot owners stretch a typical lifespan toward the upper end of four to six years without turning cleaning into a hobby, and it aligns with the replacement intervals most manufacturers publish for filters, brushes, and batteries.
Think of your robot as a small appliance that inhales dust and then tries to empty it somewhere safe. Every pass over crumbs, sand, and pet hair sends debris through the suction path, into the dust box or bag, across the vacuum filter, and sometimes into a water tank or mop pads if you use a vacuum mop. Without a schedule to empty, clean, and check those parts, even strong suction and high suction power cannot compensate for a choked filter or a jammed brush, so a simple routine becomes the cheapest way to protect both suction performance and overall lifespan.
Quick visual guide (image suggestions with alt text):
- Photo 1: Robot vacuum with open dust box on a kitchen floor — alt="robot vacuum dust box being emptied into trash can"
- Photo 2: Close-up of washable HEPA filter under a running tap — alt="washing a robot vacuum HEPA filter with clean water"
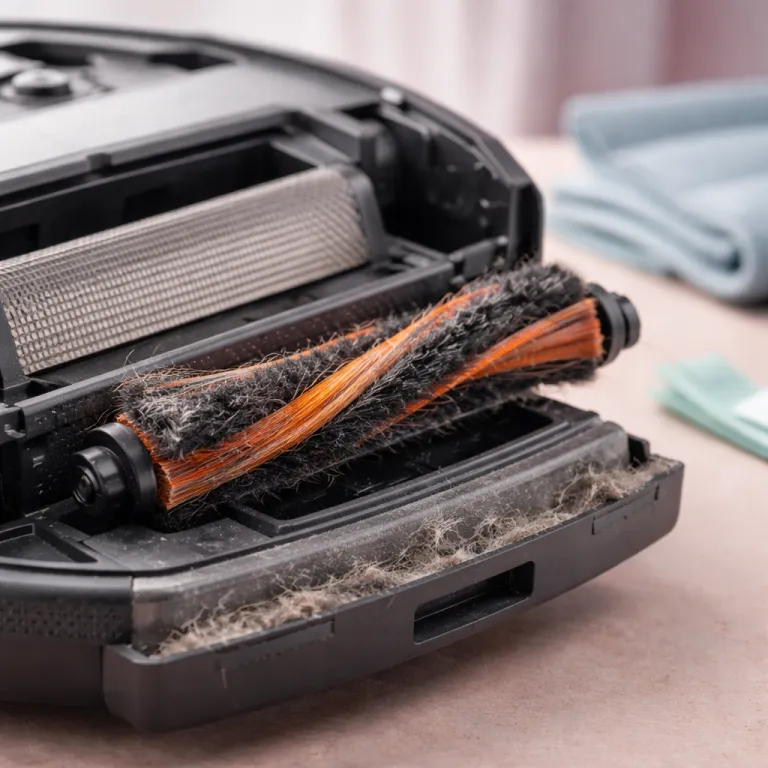
- Photo 3: Upside-down robot showing hair wrapped around the main brush — alt="hair tangled around a robot vacuum main brush before cleaning"
The three failures that actually kill robot vacuums
The first failure is suction loss, and it almost never starts with the motor. In real homes, suction power fades because the dust box is packed, the auto empty bag in the base station is overfilled, or the vacuum filter is coated in fine dust that no longer lets air through. Many mid-range and premium models, such as the Roomba j7, Roborock Q Revo, and Ecovacs Deebot X1, use pleated HEPA-style filters that trap very fine particles and therefore clog faster than older sponge designs. When you skip basic vacuum maintenance, the robot keeps trying to clean, but the performance quietly drops until it is just pushing crumbs around.
The second failure is wheel drag, which you usually feel as the robot turning in lazy circles or getting stuck on nothing. Hair and thread wrap around the wheels and the main brush, adding friction that the robot vacuums interpret as obstacles, so the cleaning pattern becomes chaotic and coverage suffers. A quick check of the wheels, the side brush, and the main brush every month prevents this drag, especially in homes with long hair or heavy pet hair shedding, and mirrors the brush inspection intervals listed in many user manuals.
The third failure is dock misalignment, when the robot cannot quite find or seat on the base station. Dust on cliff sensors, grime on charging contacts, or a warped mop pad bracket can make the robot think the floor is a drop or the dock is not there, so the empty robot routine never starts and the battery never fully charges. This is where a simple wipe of sensors and a careful clean of the dock area, sometimes with a dedicated electric spin scrubber or similar cleaning brush, keeps the auto empty cycle reliable and the water tank refills accurate for models that mop.
The 15 minute monthly sequence that saves your robot
A practical robot vacuum maintenance schedule for a busy parent lives in a single 15 minute monthly routine. Start by pressing the release on the dust box, empty it fully, and if you have an auto empty base station, open the compartment and check whether the bag is near full or needs a replace before it bursts. Tap the dust box over a bin, then rinse it with water if the manual allows, and let it dry while you move on; many popular models, including the Roborock S8 and Ecovacs Deebot N10, specify that the dust container itself is washable while the main body is not.
Next, pull out the vacuum filter from the dust box and inspect the pleats for fine dust. Washable filters, common on Roborock and some Ecovacs units, can usually be rinsed gently with clean water from the clean side out, while disposable filters, still used on many Roomba models, should only be tapped or brushed to remove loose dust. In both cases, let washable filters dry completely before reinstallation to avoid sending moisture toward the suction motor, and plan to replace disposable filters every few months so the robot never has to work with a clogged filter.
Then flip the robotic vacuum over and remove the main brush and side brush. Cut away hair with scissors, slide off any end caps, and clean the bearings, because this simple step helps robot wheels spin freely and keeps strong suction focused on the floor instead of fighting friction. While the robot is upside down, wipe the sensors, check the mop pads or mop pad bracket for grime, and inspect the water tank seals so your vacuum mop does not leak during cleaning, then set every damp part aside to dry while the robot rests off the dock.
15-minute monthly checklist:
- Empty and, if allowed, rinse the dust box; check the auto empty bag level
- Clean or wash the vacuum filter (washable vs disposable per manual)
- Remove hair from main brush, side brush, and wheel wells
- Wipe sensors, charging contacts, and mop pad bracket
- Lay washed parts out to dry fully before reassembly
Weekly, quarterly, and yearly tasks that keep performance steady
Weekly care is light: think of it as a quick health check rather than a full service. Empty the dust box or confirm that the auto empty base station has actually pulled debris into the bag, because a stuck chute can leave dust packed inside the robot even when the dock sounds normal. Glance at the main brush for obvious hair wraps and at the mop pads for dark streaks that mean they need a wash or a replace mop set, and give the top sensors a fast wipe if you notice navigation getting sloppy.
Quarterly, add deeper tasks to your robot vacuum maintenance schedule to keep cleaning performance consistent. Rotate or replace the main brush if the rubber fins are nicked, swap the side brush if bristles are bent, and wash or replace mop pads so they still glide smoothly instead of smearing dirty water. For models with a water tank, flush it with clean water, then let it dry open to avoid mold that can spread smells across your floors every time the robot starts a mop cycle, a step many manufacturer guides now highlight for homes using detergent additives.
Once a year, treat the robot like a small appliance service visit. Order a full kit of consumables, including a new vacuum filter set, a main brush, a side brush, fresh mop pads, and at least one spare dust bag for the base station, so you are never stuck waiting for parts when suction suddenly drops. Run a battery calibration by letting the robot clean until it returns to the dock nearly empty, then charge it fully without interruption, which helps the software estimate remaining run time more accurately; always confirm the exact steps in your manufacturer’s manual, because some lithium batteries are designed for partial charge cycles rather than frequent deep discharges.
Drying, parts, and when to repair or replace
Drying is the most skipped step in any robot vacuum maintenance schedule, and it quietly causes some of the worst damage. A damp vacuum filter or wet dust box sends moisture toward the suction motor, and over time that combination of water and dust can form a paste that clogs vents and strains strong suction systems. The same problem appears in water tank compartments and under mop pads, where trapped moisture encourages mold that then spreads across floors during cleaning and can leave a persistent musty smell even after you swap pads.
To avoid this, always let washed parts air dry for at least twenty four hours before you reassemble the robot. Lay the vacuum filter, dust box, mop pads, and any removable brush parts on a towel in a warm, ventilated room, and only reinstall them when they feel completely dry to the touch. This simple habit helps robot components last longer and keeps suction power closer to factory levels, even after years of daily use, and it matches the drying guidance printed in most modern robot vacuum manuals.
Knowing when to repair or replace is the final piece of a smart vacuum maintenance plan. If your robot vacuum suddenly leaves lines of dust, struggles with pet hair, or fails to reach the base station, run a five minute triage by emptying the dust box, cleaning the filter, checking the brush and side brush, and wiping sensors before assuming a real failure. When repeated maintenance no longer restores cleaning performance, or when replacement parts like a main brush, vacuum filter, or base station bag become hard to find, that is the moment to consider a new model rather than sinking more time into an aging unit, especially once you pass the four to six year mark that many families report as a natural upgrade window.
FAQ
How often should I empty the dust box or base station bag ?
In a typical family home with kids and pets, you should empty the dust box after every one or two full cleaning runs unless you have a reliable auto empty base station. For auto empty systems, check the bag weekly and replace it whenever it feels two thirds full, because an overfilled bag can block airflow and reduce suction power. Heavy shedding or renovation dust may require more frequent checks to protect the vacuum motor and filter, and many manufacturers note that construction debris should be avoided or cleaned with a traditional upright vacuum instead.
When do I need to replace the filter, brush, and mop pads ?
Most washable filters should be rinsed every one to three months and replaced every six to twelve months, depending on dust levels and pet hair. Main brushes usually last six to twelve months before the rubber or bristles wear down, while side brushes and mop pads often need a replace cycle slightly sooner in homes with frequent cleaning. Ordering a full set of spares once a year keeps your robot vacuum ready for quick maintenance without waiting for deliveries; always check your specific model’s guidance for exact intervals, because some HEPA filters and premium rubber brushes are rated for longer service.
Why is my robot vacuum suddenly much louder or weaker ?
A sudden change in noise or suction usually points to a clogged vacuum filter, a packed dust box, or a jammed brush rather than a failing motor. Start by emptying the bin, cleaning or replacing the filter, and removing hair from the main brush and side brush, then run a short test clean. If performance returns to normal, you have confirmed that maintenance, not repair, was the real issue, and you can add those quick checks to your regular robot vacuum maintenance schedule.
Is it safe to wash the dust box and water tank with soap ?
Most manufacturers allow rinsing the dust box and water tank with plain water, but many advise against strong detergents that can leave residue inside the vacuum. If you use a mild soap, rinse thoroughly and let every part dry completely before reassembly to avoid foam or moisture reaching the suction motor. Always keep the main body of the robot vacuum, including the motor area and charging contacts, away from running water, and follow any specific cleaning icons printed on the dust box or water tank.
How do I know when it is time to replace the whole robot ?
It is usually time to replace the robot vacuum when full maintenance no longer restores cleaning performance, when the battery can no longer finish a normal run, or when essential parts like filters and brushes are no longer available. If the cost of a new battery, main brush, and filter set approaches a large fraction of a new model with better suction power and features, replacement often makes more sense. For many families, that point arrives after roughly four to six years of regular use with a consistent maintenance schedule, though exact lifespans vary by brand, environment, and how closely you follow the care instructions in the manual.